SecurityTesting is an open source IDE plugin designed to allow developers to run security testing tools from within their IDE. The following IDEs and tools are currently supported:
####IDE
- Eclipse (Luna and Mars)
####Security Testing Tools
- OWASP Zed Attack Proxy (v 2.4.x)
All of the SecurityTesting plugins are based on Apache Maven and require the Eclipse Plugin Development Environment (PDE) features to be installed in your Eclipse IDE.
The build process is relatively straightforward:
- Download a copy of the source code from the GitHub repository.
- Import all of the projects into Eclipse using the "import existing Maven project" feature.
- Use the "maven install" goal on the imported projects in the following order: * com.polyhedral.security.testing.core * com.polyhedral.security.testing.core.feature * com.polyhedral.security.testing.zedattackproxy * com.polyhedral.security.testing.zedattackproxy.feature * com.polyhedral.security.testing.site
- Use the “Install New Software…” feature in Eclipse to install the update site ZIP file generated in the com.polyhedral.security.testing.site build.
Once the plugin has been installed, you will need to configure it with the location of your ZAP installation. To configure the ZAP plugin, go to:
Eclipse Preferences -> Security Testing -> Zed Attack Proxy.
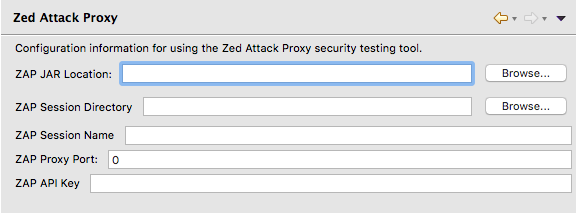
The following information needs to be provided to configure the ZAP plugin and allow you to start a headless version of ZAP from the plugin:
- ZAP JAR Location - This is the fully qualified path to the ZAP JAR file (e.g. /path/to/my/ZAP/install/zap-2.4.x.jar).
- ZAP Session Directory - This is the fully qualified path to the directory where you want your ZAP instance to store its session data. Please Note: This directory needs to be write-enabled for your user account.
- ZAP Session Name - This is the name of the session file that will be written to the ZAP Session Directory. Changing this name will create a new ZAP session file.
- ZAP Proxy Port - The port on your computer where the ZAP instance will be running. This port needs to be available, or ZAP will fail to initialize on startup.
- ZAP API Key - A randomized alphanumeric character string used by the ZAP API to authenticate valid requests. Without the API Key, a user cannot make calls to the ZAP API.
Please Note: You can use the ZAP plugin to connect to an existing ZAP instance that is running on your PC. If you wish to connect to ZAP in this fashion, provide the existing ZAP Proxy Port and ZAP API Key stored in the ZAP GUI's configuration.
Once you have entered your ZAP plugin configuration, save the changes and exit the Eclipse Preferences screen.
Once you have your ZAP configuration in place, you can start ZAP in headless mode using the plugin. First, you need to open the ZAP Eclipse View. It is located under:
Window -> Show View -> Other... -> Security Testing -> ZAP Scanner
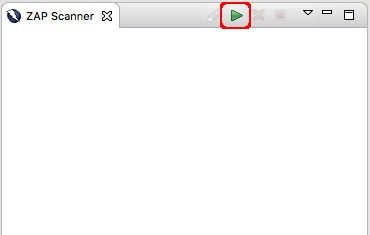
You will see a blank ZAP Scanner view panel open, with the Start ZAP Server button (a green triangle icon) activated, as seen in the image below. If you have not provided all of the required ZAP configuration, then all of the activity buttons will be disabled.
Click on the Start ZAP Server button and the Eclipse Console will begin logging activity as a headless instance of the ZAP scanner is started. Once ZAP has fully initialized, the ZAP Scanner view panel will populate with the scan parameter view, as seen in the image below.
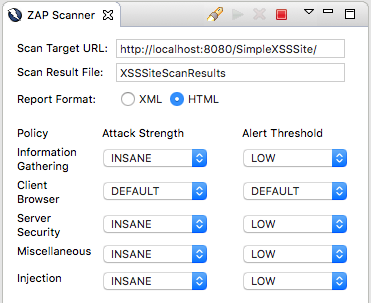
The ZAP Scanner parameter view allows you to provide the following information for performing a ZAP scan against a web application:
- Scan Target URL - This is the root URL of the web application you want ZAP to scan and test.
- Scan Result File - This is the base name for the results files that will be generated by the scan results. Two files will be generated after every scan, and the Scan Result File is used to allow multiple scan results to be stored at a given time. Please Note: When starting a new scan, if a result file already exists that matches the Scan Result File name, the plugin will prompt you to confirm whether you want to overwrite the existing file with the new scan results.
- Report Format - The format of the ZAP active scan results. Every scan will generate two files. A text file containing the results of the spider, and either an XML or HTML file with the results of the active scan based on which Report Format option is selected.
- Policy/Attack Strength/Alert Threshold - ZAP is configured with multiple scan policies which will all be run during the active scan. For each scan policy, you can choose the strength of the attack for that policy and the threshold severity for when the scan should report a finding. The configuration options are as follows:
- Attack Strength - DEFAULT, LOW, MEDIUM, HIGH, and INSANE
- Alert Threshold - OFF, DEFAULT, LOW, MEDIUM, and HIGH
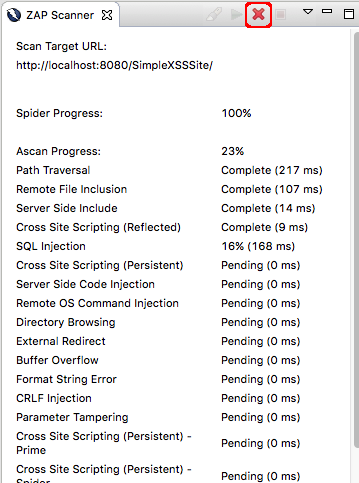
Once you have provided all of the parameters in the ZAP Scanner parameter view, you are now ready to start your scan. At the top of the ZAP Scanner parameter view, you will see the Run ZAP Spider/Ascan button (a yellow flashlight icon), as seen in the image below. Click on the Run ZAP Spider/Ascan button to start the scan.

Once the scan has started, the ZAP Scanner view will switch to a progress tracker, as seen in the image below. If for some reason you decide that you need to cancel the currently running scan, you can click on the Cancel ZAP Spider/Ascan button (the red X icon) to stop the current scan and return to the ZAP Scanner parameter view.
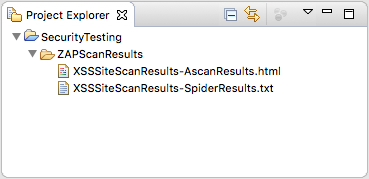
After the scan has completed, you will be returned to the ZAP Scanner parameter view. Additionally, the results of your scan will be dumped into files in an Eclipse project called SecurityTesting under the ZAPScanResults folder, as seen in the image below. These files contain the spider and scan results from all of your ZAP plugin runs, so make sure to find the files that start with the correct Scan Result File name.
When the plugin starts the headless ZAP server instance, it is created as an independent process. As such, it will not automatically be shutdown when you close Eclipse. In order to prevent your ZAP server process from continuing to run until you shut down your computer, you can click on the Stop ZAP Server button (the red square icon) from the ZAP Scanner parameter view. This will shut down the headless ZAP server instance and return the ZAP Server view to the original blank startup view.
