The yw-prototypes repository contains early implementations of YesWorkflow, an approach to modeling conventional scripts and programs as scientific workflows. The software is described in these two publications:
-
T. McPhillips, T. Song, T. Kolisnik, S. Aulenbach, K. Belhajjame, R.K. Bocinsky, Y. Cao, J. Cheney, F. Chirigati, S. Dey, J. Freire, C. Jones, J. Hanken, K.W. Kintigh, T.A. Kohler, D. Koop, J.A. Macklin, P. Missier, M. Schildhauer, C. Schwalm, Y. Wei, M. Bieda, B. Ludäscher (2015). YesWorkflow: A User-Oriented, Language-Independent Tool for Recovering Workflow Information from Scripts. International Journal of Digital Curation 10, 298-313. [PDF]
-
T. McPhillips, S. Bowers, K. Belhajjame, B. Ludäscher (2015). Retrospective Provenance Without a Runtime Provenance Recorder. 7th USENIX Workshop on the Theory and Practice of Provenance (TaPP'15). [PDF]
YesWorkflow aims to provide a number of the benefits of using a scientific workflow management system without having to rewrite scripts and other scientific software. Rather than reimplement code so that it can be executed and managed by a workflow engine, a YesWorkflow user simply adds special YesWorkflow (YW) comments to existing scripts. These comments declare how data is used and results produced, step by step, by the script. The YesWorkflow tools interpret the YW comments and produce graphical output that reveals the stages of computation and the flow of data in the script.
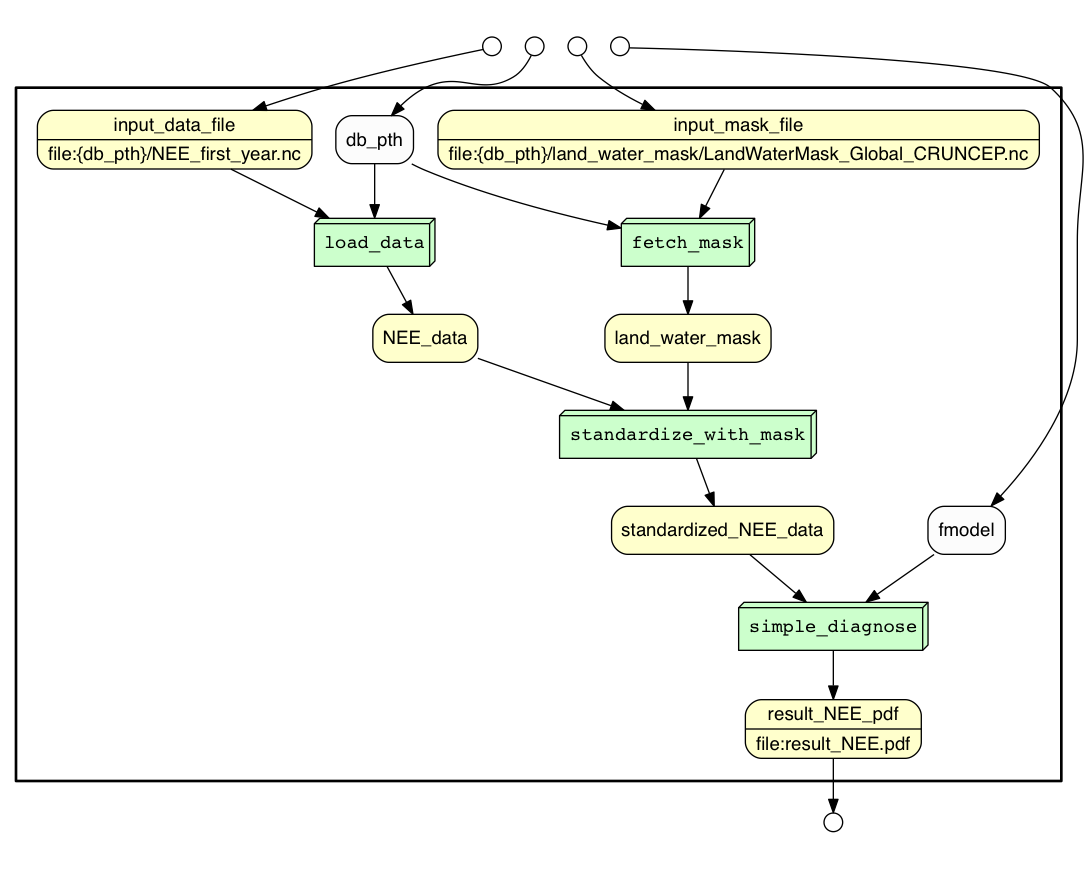
The image below was produced by YesWorkflow using the YW comments added to a conventional (non-dataflow oriented) python script (example.py):

The green blocks represent stages in the computation performed by the script. The labels on arrows name the input, intermediate, and final data products of the script.
The example.py script includes YesWorkflow comments that precede the main function and declare the inputs and outputs of the script as a whole:
# @BEGIN main
# @PARAM db_pth
# @PARAM fmodel
# @IN input_mask_file  @URI file:{db_pth}/land_water_mask/LandWaterMask_Global_CRUNCEP.nc
# @IN input_data_file  @URI file:{db_pth}/NEE_first_year.nc
# @OUT result_NEE_pdf  @URI file:result_NEE.pdf
Each YesWorkflow (YW) comment is identified by a keyword that begins with the '@' symbol. A @BEGIN comment declares the beginning of the script or of a block of computation within the script. (Because YW keywords are case-insensitive, @BEGIN, @begin and @Begin all work equally well.) Each @BEGIN tag is paired with an @END later in the script, and together these tags delimit the code annotated by other YW comments found in that block. The script example.py ends with this YW comment:
# @END main
The script inputs (input_data_file and input_mask_file) and outputs (result_NEE_pdf) appear in the diagram produced by YesWorkflow because they are declared using the @IN and @OUT comments shown above. The text following the first two @URI keywords indicate that the inputs are read from files at the indicated locations; the {db_pth} portion of these file paths indicate that the locations of these files are configurable, with the value of the db_pth (a parameter to the script) forming part of the path to the files.
Between the @BEGIN and @END comments for the main block, example.py includes four blocks of code also annotated with YW comments. The block of code performing the fetch_mask operation (represented as a green box in the diagram above) is:
# @BEGIN fetch_mask
# @PARAM db_pth
# @IN g @AS input_mask_file @URI file:{db_pth}/land_water_mask/LandWaterMask_Global_CRUNCEP.nc
# @OUT mask @AS land_water_mask
g = netCDF4.Dataset(db_pth+'/land_water_mask/LandWaterMask_Global_CRUNCEP.nc', 'r')
mask = g.variables['land_water_mask']
mask = mask[:].swapaxes(0,1)
# @END fetch_mask
The text following the (optional) @AS keyword in an @IN or @OUT comment provides an alias for the actual value or variable (the term immediately following the @IN or @OUT keyword) that represents that input or output in the script. It is the alias that is displayed in YesWorkflow results and that is used to infer how data flows through the script. Note that in the diagram the arrow labeled input_mask_file is connected to the fetch_mask block because the alias for the @IN comment for fetch_mask matches the @IN comment on the encompassing main block.
Note as well that the @OUT comment for fetch_mask declares the name of the variable (mask) used to store the mask in the code. It also provides an alias (land_water_mask) that is displayed in the graphical output of YesWorkflow. This alias matches the alias on an @IN comment on the downstream standardize_with_mask block, and YesWorkflow draws an arrow in the diagram accordingly.
YesWorkflow comments of the kind discussed here can be added to any script to highlight how data is processed by that script. YesWorkflow tools discover these comments in the script and produce graphical representations of the script that highlight its workflow-like structure. YesWorkflow can render a number of different views of the workflow structure of a script, including a process view (shown above), a data view, and a combined (data + process) view. The data view of the example script is shown below.
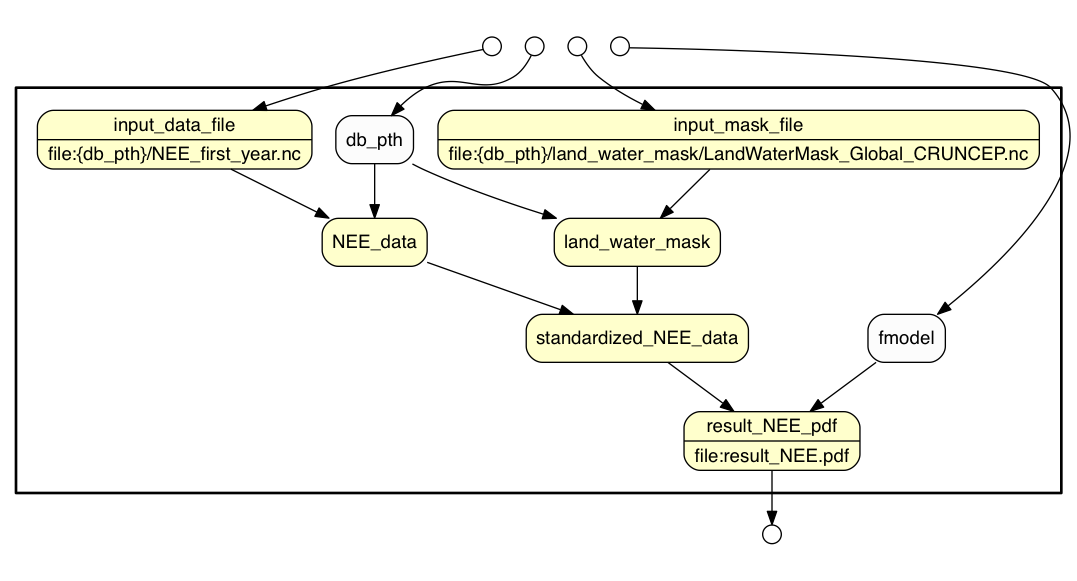
And the combined view is:
The remainder of this README provides instructions for getting started with the YesWorkflow tools, either as a user or as a developer. There currently are two YesWorkflow prototypes in this repository. A python implementation can be found in src/resources/main/python. A README.txt in that directory provides further information and instructions. The remainder of this file pertains to the Java implementation.
These instruction explain how to set up an environment for running the YesWorkflow prototype on a script that has been marked up with YW comments.
YesWorkflow requires Java (JRE) version 1.7 or higher. To determine the version of java installed on your computer use the -version option to the java command. For example,
$ java -version
java version "1.7.0_67"
Java(TM) SE Runtime Environment (build 1.7.0_67-b01)
Java HotSpot(TM) 64-Bit Server VM (build 24.65-b04, mixed mode)
$
Instructions for installing Java may be found at http://docs.oracle.com/javase/7/docs/webnotes/install/. If you plan to develop with YesWorkflow be sure that you install the JDK.
YesWorkflow produces graphical representations that is rendered using Graphviz or other software capable of processing DOT graph files. You can find instructions for installing Graphviz at http://graphviz.org/Download.php. Make sure that the dot command is in your path following installation.
The YesWorkflow prototype is distributed as a jar (Java archive) file that can be executed using the java -jar command.
If you will be building YesWorkflow yourself using Maven (see Instructions for Developers below) then you may simply use the file target/yesworkflow-0.2-SNAPSHOT-jar-with-dependencies.jar produced by the mvn package command.
Otherwise download the latest automatically built jar from the build server. Navigate to the results for the last successful build of YesWorkflow, click the Artifacts tab, then download the executable jar. The file will be named yesworkflow-0.2-SNAPSHOT-jar-with-dependencies.jar.
Once you have obtained the YesWorkflow jar, save the file in a convenient location. YesWorkflow can now be run using the java -jar command. Test that the jar works correctly using the --help option to display usage information and command line options for YesWorkflow:
$ java -jar yesworkflow-0.2-SNAPSHOT-jar-with-dependencies.jar --help

usage: yw <command> [source file(s)] [-c <name=value>]...

Command                    Function
-------                    --------
extract                    Identify YW comments in script source file(s)
model                      Build workflow model from identified YW comments
graph                      Graphically render workflow model of script

Option                     Description
------                     -----------
-c, --config <name=value>  Assign value to configuration option
-h, --help                 Display this help

Configuration Name         Value
------------------         -----
extract.comment            Single-line comment delimiter in source files
extract.factsfile          File for storing prolog facts about scripts
extract.language           Language used in source files
extract.listfile           File for storing list of extracted comments
extract.skeletonfile       File for storing YW-markup skeleton of source files
extract.sources            List of source files to analyze

model.factsfile            File for storing prolog facts describing model
model.workflow             Name of top-level workflow in model

graph.datalabel            Info to display in data nodes: NAME, URI, or BOTH
graph.dotcomments          Include comments in dot file (ON or OFF)
graph.dotfile              Name of GraphViz DOT file to write graph to
graph.edgelabels           SHOW or HIDE labels on edges in process and data views
graph.layout               Direction of graph layout: TB, LR, RL, or BT
graph.params               SHOW, HIDE, or REDUCE visibility of parameters
graph.portlayout           Layout mode for workflow ports: HIDE, RELAX or GROUP
graph.subworkflow          Qualified name of (sub)workflow to render
graph.title                Graph title (defaults to workflow name)
graph.titleposition        Where to place graph title: TOP, BOTTOM, or HIDE
graph.view                 Workflow view to render: PROCESS, DATA or COMBINED
graph.workflowbox          SHOW or HIDE box around nodes internal to workflow

Examples
--------
$ yw extract myscript -c extract.comment='#' -c extract.listfile=comments.txt
$ yw graph myscript.py -config graph.view=combined -config graph.datalabel=uri
$ yw graph scriptA.py scriptB.py > wf.gv; dot -Tpdf wf.gv -o wf.pdf; open wf.pdf
If you are running YesWorkflow on an Apple OSX or Linux system (or use Git Bash or Cygwin on Windows), you may define a bash alias to simplify running YesWorkflow at the command line. On Windows platforms you similarly may define a macro for running YesWorkflow at the prompt.
For example, if you have saved yesworkflow-0.2-SNAPSHOT-jar-with-dependencies.jar to the bin subdirectory of your home directory, the following command will create a bash alias for running YesWorkflow simply by typing yw:
alias yw='java -jar ~/bin/yesworkflow-0.2-SNAPSHOT-jar-with-dependencies.jar'
On Windows the command to create the yw macro is:
doskey yw=java -jar %USERPROFILE%\bin\yesworkflow-0.2-SNAPSHOT-jar-with-dependencies.jar $*
The command to display YesWorkflow command line options is now simply:
$ yw --help
The example.py script is useful for demonstrating YesWorkflow capabilities. You can download it to your computer here. (If you have cloned the yw-prototypes repository, the script is in the src/main/resources directory.) In the examples below it is assumed that example.py is in your current working directory.
First, use the YesWorkflow extract command and -c extract.listfile option to list the YW commands found in the script:
$ yw extract example.py -c extract.listfile
@BEGIN main
@PARAM db_pth
@PARAM fmodel
@IN input_mask_file  @URI file:{db_pth}/land_water_mask/LandWaterMask_Global_CRUNCEP.nc
@IN input_data_file  @URI file:{db_pth}/NEE_first_year.nc
@OUT result_NEE_pdf  @URI file:result_NEE.pdf
@BEGIN fetch_mask
@PARAM db_pth
@IN g  @AS input_mask_file  @URI file:{db_pth}/land_water_mask/LandWaterMask_Global_CRUNCEP.nc
@OUT mask  @AS land_water_mask
@END fetch_mask
@BEGIN load_data
@PARAM db_pth
@IN input_data_file  @URI file:{db_pth}/NEE_first_year.nc
@OUT data  @AS NEE_data
@END load_data
@BEGIN standardize_with_mask
@IN data @AS NEE_data
@IN mask @AS land_water_mask
@OUT data @AS standardized_NEE_data
@END standardize_with_mask
@BEGIN simple_diagnose
@PARAM fmodel
@IN data @AS standardized_NEE_data
@OUT pp  @AS result_NEE_pdf  @URI file:result_NEE.pdf
@END simple_diagnose
@END main
$
This command is useful for confirming that YesWorkflow is finding the comments that you have added to a script and is not confused by other comments and code in the script.
Next, use the graph command to produce a graphical representations of the script based on the YW comments it contains. YesWorkflow natively outputs GraphViz's DOT format (file extension .gv). If you don't provide a file name for storing the DOT output it will be sent to the terminal:
$ yw graph example.py
digraph Workflow {
rankdir=LR
fontname=Courier; fontsize=18; labelloc=t
label=main
subgraph cluster_workflow_box_outer { label=""; color=black; penwidth=2
subgraph cluster_workflow_box_inner { label=""; color=white
node[shape=box style=filled fillcolor="#CCFFCC" peripheries=1 fontname=Courier]
fetch_mask
load_data
standardize_with_mask
simple_diagnose
edge[fontname=Helvetica]
load_data -> standardize_with_mask [label=NEE_data]
fetch_mask -> standardize_with_mask [label=land_water_mask]
 -> simple_diagnose [label=standardized_NEE_data]
}}
subgraph cluster_input_ports_group_outer { label=""; color=white
subgraph cluster_input_ports_group_inner { label=""; color=white
node[shape=circle style=filled fillcolor="#FFFFFF" peripheries=1 fontname=Courier width=0.2]
input_mask_file_input_port [label=""]
input_data_file_input_port [label=""]
}}
subgraph cluster_output_ports_group_outer { label=""; color=white
subgraph cluster_output_ports_group_inner { label=""; color=white
node[shape=circle style=filled fillcolor="#FFFFFF" peripheries=1 fontname=Courier width=0.2]
result_NEE_pdf_output_port [label=""]
}}
edge[fontname=Helvetica]
input_mask_file_input_port -> fetch_mask [label=input_mask_file]
input_data_file_input_port -> load_data [label=input_data_file]
edge[fontname=Helvetica]
simple_diagnose -> result_NEE_pdf_output_port [label=result_NEE_pdf]
}
You can save the DOT output to a file, render it as PDF file using Graphviz's dot command, then open the PDF file to view the diagram:
$ yw graph example.py > example.gv
$ dot -Tpdf example.gv -o example.pdf
$ open example.pdf
On Windows platforms the last line above should be replaced with:
$ start example.pdf
Alternatively, you can pipe yw into dot and open the graphics file immediately (here using png rather than PDF). In the case of bash running on Unix platforms:
$ yw graph example.py | dot -Tpng -o example.png && open example.png
And on Windows platforms:
$ yw graph example.py | dot -Tpng -o example.png && start example.png
You should now be able to add YW comments to your own data processing script and analyze your script using the YesWorkflow prototype.
The YesWorkflow prototype assumes that the code for the entire script to be analyzed is bracketed by a pair of @begin and @end comments. The YW comments may appear anywhere comments are allowed by the scripting language you are using. For example, a script written in a language that uses the # character to start comments might look like the following
# @begin MyScript
script statement
script statement
script statement
# a non-YW comment
script statement
script statement
script statement
# @end MyScript
Note that comments that do not contain YW keywords are ignored by YesWorkflow.
@begin and @end keywords both should be followed by the name of the block of code they bracket (in this case, the script as a whole), and these names should match for each @begin and @end pair. This convention makes it easier to identify incorrectly paired @begin and @end keywords in the script.
The next step in marking up a script with YW comments is to declare the inputs and outputs of the script. These do not need to be actual command-line options to your script or files read from or output to disk by the script. The comments you add simply declare that the script accepts these inputs in some way, and produces the indicated outputs somehow.
This is done by adding @in and @out comments following the @begin comment for your script. For example:
# @begin MyScript
# @in x
# @in y
# @out d
script statement
script statement
script statement
# a non-YW comment
script statement
script statement
script statement
# @end MyScript
The @in and @out comments above indicate that the script takes two inputs, x and y, and produces output d. The names of these inputs and outputs (multiple inputs and outputs are allowed) are expected to correspond to the names of variables that store these input and output values at some point in the script (although this is not enforced by the prototype). Declaring the names of the relevant variables is meant to make it easier for others to find the actual input and output operations in your script.
Multiple YW comments can be placed on the same line. For example, the example below is equivalent to the one above:
# @begin MyScript @in x @in y @out d
script statement
script statement
script statement
# a non-YW comment
script statement
script statement
script statement
# @end MyScript
Because variable names are often kept relatively short in scripts, YesWorkflow allows you to associate a more verbose alias for each input and output using the @as keyword. For example:
# @begin MyScript
# @in x @as XCoordinate
# @in y @as YCoordinate
# @out d @as DistanceFromOrigin
script statement
script statement
script statement
# a non-YW comment
script statement
script statement
script statement
# @end MyScript
Analysis performed by YesWorkflow and the outputs it produces use these aliases if present, and the unaliased names otherwise.
The YesWorkflow prototype assumes that a script has a single, top-level block of code delimited by the @begin and @end statements described above, and additionally one or more marked up computational blocks nested within this top-level block. You can use these nested blocks to describe the computational steps in your script in dataflow terms. For example, we can declare two computational code blocks within MyScript:
# @begin MyScript
# @in  x @as XCoordinate
# @in  y @as YCoordinate
# @out d @as DistanceFromOrigin

  # get input x somehow
  # get input y somehow

  # @begin SquareCoordinates
  # @in  x  @as XCoordinate
  # @in  y  @as YCoordinate
  # @out xx @as XSquared
  # @out yy @as YSquared
  script statement
  script statement
  # @end SquareCoordinates

  # @begin SumSquares
  # @in  xx @as XSquared
  # @in  yy @as YSquared
  # @out s  @as SumOfSquares
  script statement
  script statement
  # @end SumSquares

  # @begin TakeSquareRoot
  # @in  s @as SumOfSquares
  # @out d @as DistanceFromOrigin
  script statement
  script statement
  # @end TakeSquareRoot

  # output d somehow

# @end MyScript
The @begin, @end, @in, @out, and @as keywords have the same meaning for computational blocks within the script as for the script as a whole.
At this point you may analyze your script and render it graphically, just as we did above for example.py. If your script is called MyScript.py then the command (for Unix platforms):
$ yw graph MyScript.py | dot -Tpng -o MyScript.png && open MyScript.png
or (for Windows platforms):
$ yw graph MyScript.py | dot -Tpng -o MyScript.png && start MyScript.png
will render your script as a dataflow program and illustrate how data flows from script inputs, into successive computational blocks, and finally to script outputs. For the example above, YesWorkflow produces this:

Notice that the @in and @out comments for MyScript (the script as a whole) correspond to the small, empty circles at the left and right sides of the figure, respectively. The circles on the left are connected by arrows to the SquareCoordinates block. These arrows indicate dataflow into the script and are labeled with the aliases for the script @in comments, which in turn match the @in aliases for the SquareCoordinates block.
Similarly, the circle on the far right corresponds to the script @out comment, and is connected by an incoming arrow from the TakeSquareRoot block because the MyScript @out comment and TakeSquareRoot @out comment have matching aliases. This right-most arrow represents flow of data out of the script.
The remaining arrows are drawn between blocks and represent flow of data between computational blocks. They result from matching aliases from @out comments on upstream blocks with aliases for @in comments on downstream blocks.
YesWorkflow infers the programming language employed in a script by inspecting the source file extension. Currently the following file extensions and associated comment syntaxes are recognized. Block comments may span multiple consecutive lines.
| Language | Extension | Single-line comments | Block comments |
|---|---|---|---|
| bash | .sh | # a comment |
|
| C | .c, .h | // a comment |
/* a comment */ |
| C++ | .cpp | // a comment |
/* a comment */ |
| Java | .java | // a comment |
/* a comment */ |
| MATLAB | .m | % a comment |
%{ a comment %} or ... a comment ... |
| python | .py | # a comment |
''' a comment ''' or """ a comment """ |
| R | .R | # a comment |
|
| SAS | .sas | * a comment ; or /* a comment */ |
Support for single-line comments started with a # character is assumed if the extension is not one of the above, if the file name has no extension, or if the script code is piped to YesWorkflow via the standard input stream. To manually specify a single-line comment character use the -c extract.comment= configuration option to provide the comment character in quotes. For example, to pipe a MATLAB program to YesWorkflow and use the correct comment character you may use the following command on Unix platforms:
cat myprogram.m | yw graph -c extract.comment='%' > myprogram.gv
And on Windows:
yw graph -c extract.comment='%' < myprogram.m > myprogram.gv
Configutration options for YesWorkflow may be stored in a file named yw.properties in the directory in which you run yw. Specify one option per line using a name = value syntax similar that used on the command line (in configuration files, spaces and tabs are allowed on either side of the = sign). To try this out, create a yw.properties file with the following content in the directory containing MyScript.py:
# extract configuration
extract.sources     = MyScript.py
extract.listfile    = listing.txt
extract.comment     = #

# graph configuration
graph.view          = combined
graph.layout        = tb
graph.dotfile       = combined.gv
graph.workflowbox   = show
graph.portlayout    = relax
You may now create the graph rendering of your script using the above options simply by typing:
$ yw graph
From top to bottom, the options specified in this yw.properties file cause YesWorkflow to (1) extract YW comments from MyScript.py, (2) leave the list of extracted comments in listing.txt, (3) interpret the # as the source code comment delimiter (this causes YesWorkflow to ignore comments in Python docstrings in this case), (4) render a view of the workflow graph that combines the process and data views in single graph (see figure below), (5) arrange the nodes in the graph from top to bottom, (6) write the DOT output to combined.gv, (7) draw a box around the nodes in the workflow, and (8) allow Graphviz to place the input and output nodes in locations that minimize the complexity of the graph. The graph resulting from running YesWorkflow with these options looks like this:

Type yw --help to see available options and valid values for each.
The Java prototype is built using Maven 3. Before building YesWorkflow confirm that the mvn command is in your path, that your version of Maven is at least 3.0.5, and that a JDK version 1.7 (or higher) is found by Maven:
$ mvn --version
Apache Maven 3.2.3 (33f8c3e1027c3ddde99d3cdebad2656a31e8fdf4; 2014-08-11T13:58:10-07:00)
Maven home: c:\Program Files\apache-maven-3.2.3
Java version: 1.7.0_67, vendor: Oracle Corporation
Java home: c:\Program Files\Java\jdk1.7.0_67\jre
Default locale: en_US, platform encoding: Cp1252
OS name: "windows 7", version: "6.1", arch: "amd64", family: "windows"
$
JDK 7 and Maven 3 downloads and detailed installation instructions can be found at the following links:
- Instructions for installing and configuring JDK 1.7 (Oracle Java Documentation)
- Instructions for installing and configuring Maven 3 (Apache Maven Project)
YesWorkflow adopts the default organization of source code, resources, and tests as defined by Maven. See maven.apache.org/guides/introduction/introduction-to-the-standard-directory-layout.html for more information. The most important directories are listed below:
| Directory | Description |
|---|---|
| src/main/java | Source code to be built and packaged for distribution. |
| src/main/resources | Resource files to be packaged with production code. |
| src/test/java | Source code for unit and functional tests. Not included in packaged distributions. |
| src/test/resources | Resource files available to tests. Not included in packaged distributions. |
| target | Destination directory for packaged distributions (jar files) built by maven. |
| target/classes | Compiled java classes for source code found under src/main/java. |
| target/test-classes | Compiled java classes for test code found under src/test/java. |
| target/dependency | Automatically resolved and downloaded dependencies (jars) that will be included in the standalone distribution. |
| target/site/apidocs/ | Local build of Javadoc documentation. |
YesWorkflow can be built and tested from the command line using the following commands:
| Maven command | Description |
|---|---|
| mvn clean | Delete the target directory including all compiled classes. |
| mvn compile | Download required dependencies and compile source code in src/main/java. Only those source files changes since the last compilation or clean are built. |
| mvn test | Compile the classes in src/test/java and run all tests found therein. Peforms mvn compile first. |
| mvn package | Package the compiled classes in target/classes and files found in src/main/resources in two jar files, yesworkflow-0.2-SNAPSHOT.jar and yesworkflow-0.2-SNAPSHOT-jar-with-dependencies.jar. The latter also contains all jar dependencies. Performs mvn compile and mvn test first, and will not perform packaging step if any tests fail. Use the -DskipTests option to bypass tests. |
| mvn javadoc:javadoc | Build Javadoc documentation. The mvn package command also builds Javadoc. |
All code is built and tests run automatically on a build server at NCSA whenever changes are committed to directories used by maven. Please confirm that the automated build and tests succeed after committing changes to code or resource files (it may take up to two minutes for a commit-triggered build to start). Functional tests depend on the scripts in src/main/resources and are likely to fail if not updated following changes to these scripts.
| Site | Url |
|---|---|
| Build history | https://opensource.ncsa.illinois.edu/bamboo/browse/KURATOR-YW |
| Last build | https://opensource.ncsa.illinois.edu/bamboo/browse/KURATOR-YW/latest |
| Last successful build | https://opensource.ncsa.illinois.edu/bamboo/browse/KURATOR-YW/latestSuccessful |
The link to the latest successful build is useful for obtaining the most recently built jar file without building it yourself. Follow the link to the last successful build, click the Artifacts tab, then download the executable jar.